Friday 27 November 2009

Self Evaluation

Throughout this project I encountered many problems and many success's . I discovered that problem solving is a large part of work. I often would have an idea and then work out ways in which I would accomplish my goal. The project also helped me see my strengths and weakness areas which I can develop on and areas which need vast improvements.

I was confident with my designs , drawing ability and story boards. I found it easy to conceptualize ideas. The project was well suited as I was able to include a lot of my personal interest.

The main obstacle in this project was due to the software and I realize just how important it is to become confident with the software as it can hinder you , as it did with me. The solution to this problem is simple and that is to just keep on practising , I have to live and breathe the programmes so that in future projects I can spend more time developing my ideas rather then learning the tutorials.

I also had some problems with resolution, my Aztec Ident rendered out in good resolution but after I made a final render it was never clear enough. I also had an issue with the Egyptian Ident, my logo would appear faintly in the background to early, I tried to resolve this issue but couldn't work out a way to remove the faint logo. In future projects I will be more careful when adding effects and work in a more professional manner this will hopefully come from more experience in the programmes.

The tutorials were so important to my overall outcome as well as help and advice from the tutors. I was advised to keep my ideas simple rather than getting carried away , this made sense as it is easy to get caught up in you own ambition , yet is is hard to reach your goals.

I am satisfied with the amount of work that I put into this project and realize I couldn't have worked any harder, however I am to take note of time management. I am pleased with the three Idents that I made and like the overal feel of them.

I wanted them to look slightly more polished and professional than they do, however this will just be down to learning the software to a more advanced level. I will carry on learning in my personal time so that in future projects the software will not slow me down. Overall I believe i have enjoyed a very positive learning experience and worked alot harder on this project than my previous ones. This was simply down to me being more determined this year.

Egpytian Ident 3


The camera effects worked well , however at one section it looks a bit jumpy , I wanted to correct this but ran out of time. The music worked well and directed the audience on a journey.

Egypt creative process

This is the image before I change the background and added the sun.

I felt this background was to sharp and your vision detracts from the figure. I also feel it looks like a cardboard cut out which is not the look I want.

This is the final image ready for After Effects I would have liked some sort of background but I couldn't find one which was well suited. Therefore scrapped the background . The image looks strong and I believe the sun looks as if it is glowing. However I had problems with the black background the colour kept on leaking into my image , so my whole image would drop a tone darker. I couldn't resolve this issue and had to leave it in the end.

Creative process

  • used photoshop to colour and layer selected parts
  • coloured the body to reflect the marble style of the original figure
  • layered the eye seperate so it could move
  • layered the sun seperately so I could add a glow effect
  • highlighted areas to enhance light and dark
After Effects

  • keyed in the scale tool created motion path
  • set desired motion path
  • made the eyes move
  • added glow to the sun
  • added ripple effect to sun
  • used colour correction to enhance image
  • used pre-set font
  • duration 12 seconds
Premier

  • added soundtrack
  • duration 12 seconds

Wednesday 25 November 2009

Egyptian Ident

I thought Egypt would be a good culture to include in my project , millions of people are fascinated with Egyptian art work and architecture , it is also by far the most popular part of the British Museum and brings in the largest amount of tourism compared to the other sections. I came up with the idea of an Egyptian God holding a sun then the camera would pan up slowly from his feet to his face then zoom into the sun and the writing The British Museum would appear in the sun.

Like most of my ideas , I have the idea firstly in my mind then start problem solving to figure out how i'm going to do it. Since I have been interested in Ancient cultures for along time a lot of the ideas come naturally.

I will begin by collecting some images to help aid my work.

This is the traditional Egyptian style artwork of the God Anubis , I wanted to use him as a character simply because he looks powerful and is well know out of the hundreds of Egyptian Gods.

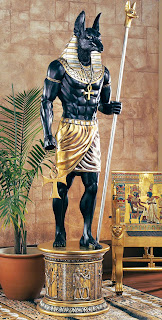
This is a modern sculpture of the same God I would like to combine the more muscular feel of this one with the traditional image.


Ident 2 Samurai


This is my second ident and felt it played smoothly. The doors worked nicely as they revealed something else to the audience. I had difficulty rendering this file for some unknown reason when I played it back in quick time it would freeze when ever I played it more then twice. I tried rendering it again but the same problem happened , maybe there is a problem with the file. However when I rendered it in the you tube video format it worked fine but this resulted in a lower quality.

The quality of this particular video looked far higher in after effects and Premier.
Once again learning video formats well is essential and I have learnt a lot from rendering so many films

Samurai Ident

I wanted to each of my Idents to be different yet follow a similar style. This one was influenced by my interest in Japan . The samurai is the main focus of this Ident, being iconic to Japan I thought it was well suited. The British Museum also has a Japanese section.

I started of by sketching a storyboard. I wanted the door's to slide back to reveal a Japanese setting . The camera would then zoom in to the Samurai, his eyes would glow white and the the font would appear.

This was my first layer in photoshop I had to layer them separately so that I could animate them separately in after effects.

This is the image before I edited it.

I then highlighted the areas of light to make it look more dramatic.

Finlay I placed the Samurai inside and highlighted him also I added the glow effect in After effects. The samurai was taken from my own photograhs, which helped as the resolution was high, i searched on google but could find any which were high res or at the desired angle.

Creative Process

  • Used images and layered them on photoshop
  • seperated the layers so that I could animate them in After Effects.
  • Highlighted select parts or my layers to look good
After Effects

  • Positioned the Anchor point so I could move the doors from a certain area.
  • Keyed the doors until the movement looked smoothe
  • used the graph editor to create the right motion
  • used the scale tool to give the illusion the samurai was coming closer
  • changed the opacity so level lit up as the doors openend
  • created fast blur so the doors looked more realistic as they opened
  • placed blur onto samurai so that he did not look to sharp when the doors opened
  • placed blur on to background so the Samuari stood out as I zoomed in
  • added glow effect to the samurai eyes
  • placed white out so it appeared as if the eyes lite up the whole room
  • used present typography
  • duration 5 seconds

Premier

  • used soundtrack
  • used Sound effect from uni hard drive
  • placed sound effect on Dore
  • rendered to desired format
  • duration 5 seconds
I had trouble with the image quality for some reason it looked better in after effects to when i rendered it out as a movie file.

I also was realizing the importance of tidy file management, as I would end up having some many video files which were slightly different I may have changed them due to their poor quality or general changes . In future projects I will create a separate folder for test files. This would make my work space allot more manageable

Aztec mask (creative process)

I had never used after effects before, but used various websites such as creative cow and videocoplitot which had many tutorials to aid me through. I also listened to advice from my tutors who felt the mask idea was strong and realistic due to the time we were given.

After finishing in After Effects I took it in to premier to add the sound. The project also gave me a chance to play around with render settings, general effects and file management.

It took a while to get the desired look I was after and i think the music added greatly to creating atmosphere.

After effects
  • Key framed panning
  • masked the eyes so they would open
  • opacity mask fade in
  • glow effect - mask becomes bright
  • opacity mask fades in as eyes open
  • minmax mosaic style effect as mask blurs to background
  • desired font to animate
  • chose font to mimic the British museum
  • render to movie
  • Duration 10 seconds
Premier

  • select music
  • black out effect at the end of ident
  • render into desired format
  • Duration 10 seconds
I spent hours watching tutorials then following them from VideoCopilot.com this gave me a basic understanding of After Effects. I used the ten basic tutorials on the website. It was essential that I watched these as I quickly realized I knew very little about After Effects.

For future refference I believe it is essential to study the tutorials as part of my research. As I did not take in to account the amount of hours which I would be spent learning the software. This prevented me from getting on with what I wanted to do , getting on with the Idents. As a result of this I will continue to study the programmes in my own time so that for future projects it will be easier to get on with my work.